Making Your Own Cold Brewed Coffee At Home Easily

Cold Brewed Coffee At Home
Coffee. It’s my daily drink of choice and I’m a huge fan of iced coffee. I drink it all summer and take it with me everywhere. I’m a bit unusual in that I can drink hot coffee, iced coffee, black coffee or coffee with cream and sugar. I prefer milk and a little sugar in my iced coffee.
I know there are coffee connoisseurs out there that may argue my method below, but trust me, give it a shot, I think you’ll fall in love with this easy way to make cold brewed coffee at home.
There are differences between cold brewed coffee (Toddy) and hot brewed. Cold brewed has more caffeine, is less bitter, it’s a bit more sweet and it’s perfect for iced coffee since it won’t melt the ice and it’s smoother to drink. To me it’s also easier to serve up quickly even though it takes a bit of time to make initially and I prefer the smoothness and taste. I keep a bottle in my fridge to pour over ice or heat up. In the summer, I’m in and out of the car and driving all day to appointments. You can bet I’ll usually have an iced coffee with me at all times.
You can go buy all the fancy gadgets to make this, they’ll be happy to sell them to you, and you may prefer to buy one, that’s great! They range from $15 to $200. For me, I don’t like tons of kitchen gadgets/appliances, so I try to keep it simple. I use my standard coffee pot. Yep, the same coffee pot we’ve always used at home doubles as my “cold/french press” coffee pot. Let’s get to how it’s done, simply and easily at home.
What you’ll need:
- Standard coffee pot
- Regular coffee filters
- Hand strainer (not totally necessary, but it definitely helps)
- Two large pitchers (or reuse plastic juice/iced tea containers)
- Coffee. Now here’s where the disagreement comes in… Generally, most people will use coarsely ground, fresh coffee. The more coarse, the better. That’s wonderful! Use whatever coffee you’d like, but I use standard coffee grounds that you’d use for hot coffee brew. Mine isn’t “muddy” at all since I strain everything three times. Also, with cold brew, you don’t need to have fresh coffee like you do with hot brewed. Older coffee works just as well, so that’s a plus if you have an older bag in the cabinet.
Directions:
- First, you’ll need to seep/soak your coffee grounds. You’ll need to do this at least 12 hours and really no longer than 18. You can soak your coffee at room temperature or in the fridge. It doesn’t really matter. Some say room temperature is preferred, but I haven’t noticed a difference.
- I use 1 full cup of coffee grounds to 5 cups of water. I usually double this to make a larger amount. This may be a bit strong for you or a bit weak. You can adjust to your liking or you can always dilute with water at the end.
- After it’s done soaking, give it a gentle stir or shake since there will be clumps at the top.
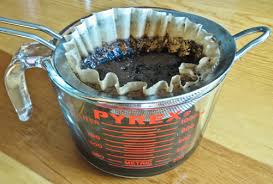
- Now comes the time consuming part, but it’s not that bad and well worth it. You’ll want to run everything through a hand strainer if you have one. size doesn’t matter. Discard the grounds.
- Now run the liquid through your regular coffee pot pouring over a standard coffee filter. Gently hold the filter at the sides, so it doesn’t collapse in. Fill almost to the top and let it drip into the glass pot. It will take a few minutes. Top off as needed. If I’m doing a large batch, I’ll switch out a new filter halfway through. When it’s down to a slow drip, you can gently lift out the filter bunching the top together and strain with your hands carefully. Repeat this process as long as needed. (The waiting pushes me to run around the kitchen cleaning, win, win.)
- After it’s all strained through the coffee filters, do it all again with a new filter. This just makes sure all the grounds are completely strained leaving a smooth, clear coffee behind.
- Pour the final coffee into your container of choice and in the fridge it goes. It’s good for up to a week.
If you don’t have a coffee pot, you can use a coffee filter and any bottle or container just as easily.
Now you have your coffee ready to serve up quickly. I love using the plastic cups and lids from places like Dunkin’ Donuts, Starbucks, etc. I reuse them since I’m usually on-the-go. I never reuse the straw though. Keep extra handy at home.
Everyone can use this cold brewed coffee to their liking and it’s so versatile. You can heat it up, add any type of cream/milk you’d like, any type of sugar/sweetener, shots of flavoring, caramel, chocolate, etc. Top it off with whipped cream, cinnamon, chunks of candy bars, add a cup to recipes like banana bread, cake, make coffee milk shakes, etc. The choices are endless and you can have it at the ready for morning, noon and night.
If you’re a big coffee drinker, you’ll find this will save you lots of money and time. No more long waits at the drive-thru (which is my pet peeve) or over spending. And I just like making things in my own kitchen. I know its fresh, clean and done my way. With a large coffee at the chain stores running $3.00 a piece, doing it this way can save you up to $700 a year. That’s a nice weekend getaway or a couple car payments. Give it a try and let me know how it turns out!
As a Realtor in the Cleveland, Ohio area, I’m big on money-saving tips and household problem solving. I write about many different topics. You can call or text me anytime: 216-323-4620 I’m always here to answer any housing questions you may have big or small. Contact Me if you or someone you know needs assistance buying or selling a home in the Cleveland, Ohio area or even in a different state. I look forward to helping you with your next move!
Follow me on Facebook and Twitter and Instagram to stay connected and for great tips and information.